by Hema and Eric Bulmer copyright 2003-2020
Click here for More Experiments
Air is matter. Air is a "something," not a "nothing." Air has mass and takes up space. Air is THERE!
Hey Nerd! It's another fun, easy-to-set-up Experiment to try in your classroom or home from Pow!Science! It doesn't get simpler (well, I guess technically it could) than this awesome, quick demo to prove that Air is Matter - that it has volume and mass.
To demonstrate that although we cannot see air, it most definitely takes up space.
1. Insert the balloon into the bottle as shown in this amazing diagram that I drew myself. The tricky part is rolling the mouth of the balloon over the OUTSIDE of the mouth of the water bottle. We know you can do it!
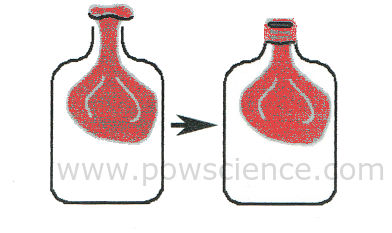
2. Put your mouth over the balloon-covered mouth of the bottle and try to blow up the balloon inside the bottle. What happens? Can you do it? You can't do it. That's ok. There's a very scientific reason why you can't.
3. WITH ADULT SUPERVISION use your scissors or knife to poke a few holes in the bottom of the plastic bottle. Hey, be careful not to damage your balloon, which is still inside.
4. Try to blow up the balloon inside the bottle again, just like you did before. How did you do?
"Matter" is anything that takes up space (has volume) and has mass. We can't see it, but air is matter! You can't inflate the balloon at first because all of the available space inside the bottle is already occupied - by air! When you punch holes in the plastic bottle, the air in the bottle has a way to LEAVE as it gets pushed out by the growing balloon.
Often when we look at a bottle or other container without any liquid or solids in it, we say it's "empty." Is it?
Hey Nerd! Red Cabbage Juice is a naturally occurring Litmus agent, detecting both acids and alkalines with a brilliant color change. The beautiful Pink color that will result from this experiment is because most Vinegar is about 5% Acetic Acid. Cabbage Juice is easy to make and has a very distinctive odor. Refrigerate any unused Cabbage Juice right away, and if you don't use it within 2 days or so, get rid of it. It has quite a stink!
Keep reading after the Graphic for Extension Ideas that can really give your Cabbage Juice experience some added Pow!

You can also dilute your Cabbage Juice with tap water and then add different household chemicals and observe any changes. Add a tablespoon or two of Cabbage Juice to about 400ml of water, then add different household chemicals!
Acids are indicated by a change to red or pinkish. Green or blue indicates an alkaline. Make predictions before you test each one!
Fun Things to Test
I have read MANY different procedures for making Cabbage Juice - many call for using distilled water. Nonsense and Rubbish. I have performed these experiments for years using tap water. It works wonderfully.
An Experiment in Static Electricity
Hey Nerd! It's another fun, easy-to-set-up Science Experiment for Kids from Pow!Science! Here's a very cool way to explore and learn about static electricity in a way that you probably haven't tried before. Best of all, the materials list is super-short, making this an ideal elementary science experiment for your classroom or home school group.
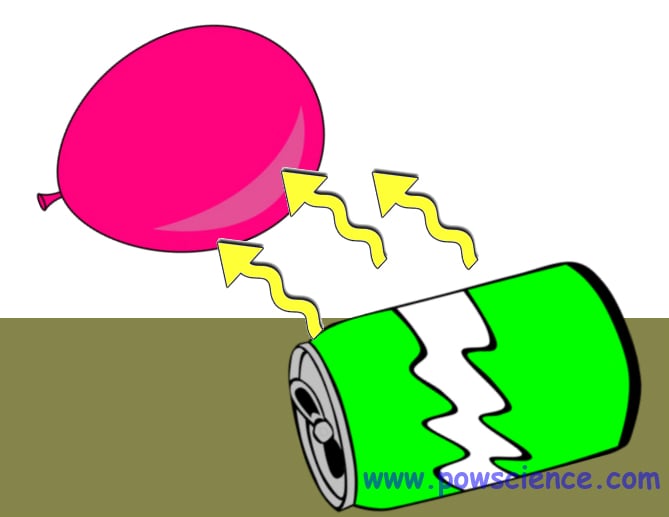
1. Blow up the balloon and tie it closed.
2. Lay the empty can on its side on your flat work surface. Make sure it's not rolling.
3. Rub the balloon on your hair to "charge it up." SLOWLY bring the balloon closer and closer to the can WITHOUT TOUCHING the can!
With just a little bit of practice, you'll be able to get the can to roll towards the balloon and right across the table or floor. WOW!!
All matter is made of atoms. All atoms have electrons surrounding them. Thus, there are electrons on the surface of the balloon and on the empty can. Electrons have a NEGATIVE charge. When you rub the balloon on your head, you're adding a tremendously huge number of electrons (from your hair) to the surface of the balloon. This makes the surface of the balloon SUPER NEGATIVE. The surface of the can is only "normal" negative.
So you've got the SUPER NEGATIVE surface of the balloon attracting the merely "normal" negative surface of the can. Usually we say "opposite charges attract." Although the balloon and the can aren't, strictly speaking, opposites, they're "opposite enough" for an attraction to happen!
Do only opposite charges attract, or will charges that are simply VERY DIFFERENT from each other attract as well? Will a slightly negative charge be attracted to a REALLY REALLY negative charge?
Have you ever tried sticking a balloon to the wall using a procedure similar to this one? Can you explain how that works now? Why does the balloon stick to the wall only after you rub it on your head? What other objects will a "charged up" balloon attract? Try it!
An experiment in Buoyancy
Hey Nerd! It's another fun, easy-to-implement Experi-Graphic from Pow!Science! You've probably got most of the materials at home already. Make sure to read after the graphic for some Extension Ideas and Follow Up Questions!
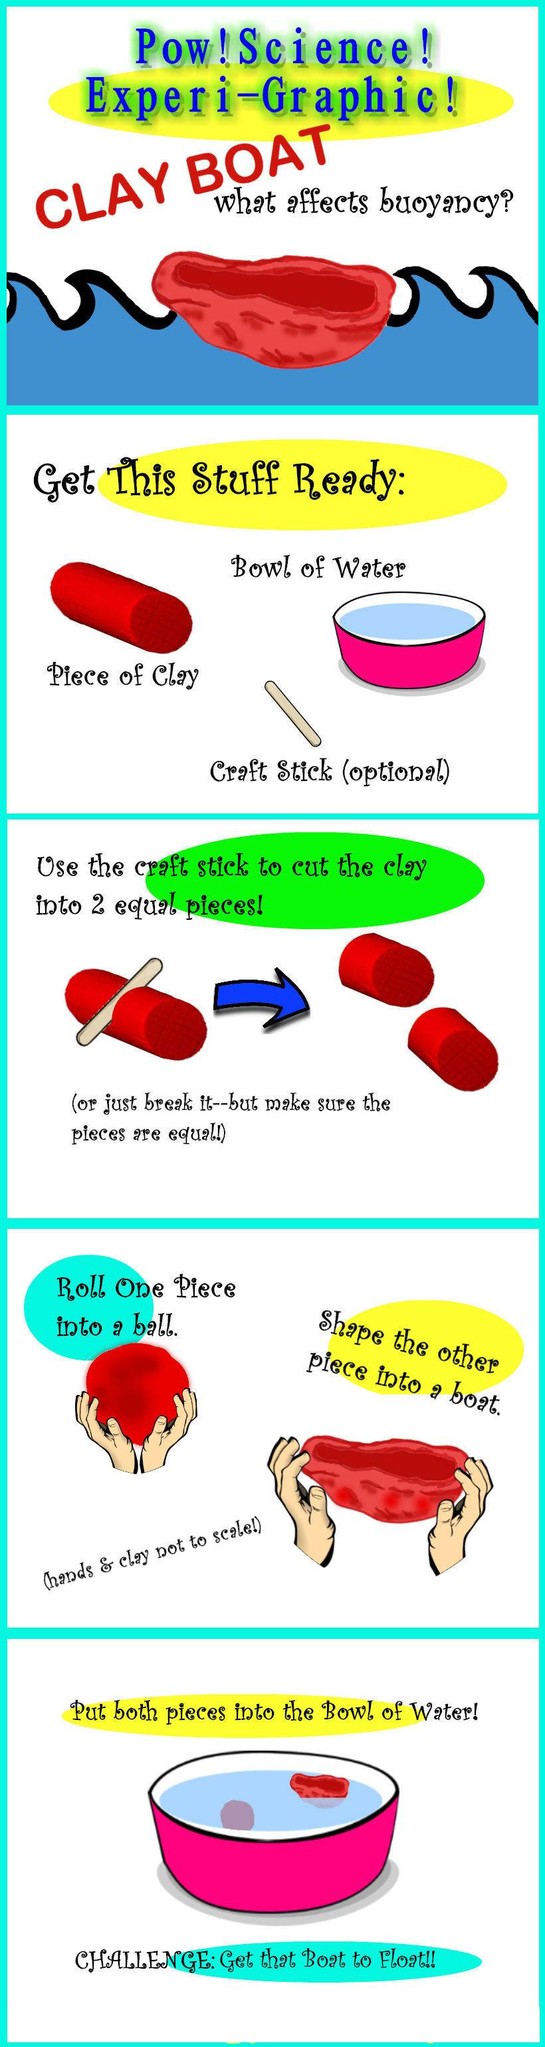
1. Why is it important to keep the two pieces of Clay equal in size?
2. Does each piece have the same mass? Why does one piece float and the other sink?
3. What factors do you think might affect floating and sinking (aka Buoyancy)?
4. What factor do you think is the most important regarding Buoyancy?
1. Have lots of pennies or marbles on hand? Once a boat is floating, place pennies (or marbles, whichever you're using) into the boat one at time. How may can the boat hold before sinking?
2. Instead of clay, use rectangles of Aluminum Foil.
1. Do not attempt this experiment with Play-Doh. It will get slimy and gross.
2. When running this activity with groups, I'll set up several "water stations" (Plastic Sterilite Containers about half full of water) at various places around the room so all of the kids have easy access.
3. Keep plenty of paper towels handy during this activity too.
Fizzing Science Fun!
Welcome, Nerd!
It's another fun, easy-to-set-up Experi-Graphic from Pow!Science!
This fun, reactive experiment is a twist on the classic "Dancing Raisins" Experiment - our problem with Dancing Raisins is that the raisins so seldom actually dance. It's so frustrating! Interestingly, we've used pasta bits (as shown below) to far greater success, as well as "Craisins" which work extremely well! They must be less dense than raisins, though to be honest I've never measured.
Try "Dancing Pasta," and be sure to read below the Graphic for Extension Ideas.

1. Use a clear soda (or just soda water) instead of the water, baking soda, vinegar called for here.
2. If you have access to Citric Acid Crystals, try a spoonful of those dissolved in a glass of water instead of the vinegar.
3. Try using "Craisins" instead of Pasta Bits. Try using Raisins, too! What works best?
4. Got a digital thermometer? Measure the temperature of the water before you dump in the vinegar and again shortly after. This is an endothermic reaction, meaning energy is absorbed, so you will see a drop in temperature!
An Experiment in Electricity and Circuits
Welcome Nerd! It's another fun, easy-to-set-up Experi-Graphic from Pow!Science!
This is a "Discovery Method" activity that I first learned from my 3rd Grade Teacher back in the 1970s, and it is just as effective today as it was back then. The materials are easy to get inexpensively and there are LOTS of directions to take the activity with your kiddos.

CAUTION. Kids should be encouraged to explore all of the different ways the wires can be applied to the light bulb in order to get it lit, BUT one thing they should be cautioned against doing is shorting the battery - this means simply, tell the kids not to touch the bare ends of the black and red wires together without the bulb being involved. Connecting the wires with no bulb for the battery to work on sets up what is called a "No Load" Circuit, more famously known as a "Short Circuit." With a mere D Battery in the box, there will be no immediate harmful result should the wire ends happen to brush together, but if the wire ends were to be held together for an extended period of time, the battery would begin to heat up.
Solutions 3 and 4 only work if there is a metallic (conducting) piece of metal on the outside of the battery box. Most battery boxes have these, but if you have one that doesn't, don't bother with Solutions 3 or 4. If your battery boxes do support solutions 3 and 4, issue this as a challenge to the kids after they've lit the bulb via solutions 1 or 2: "NOW make the bulb light using only ONE WIRE! Can you do it?"
Q: What is the Discovery Method?
A: It's a way for kids to learn how to do something simply by trying it out. Trial and error. No instructions. All you do is give them the equipment they need and one goal: Make the bulb light. When I'm teaching this activity, I'll give hints if a team is struggling - the location of ONE of the wires, perhaps.
Q: What kind of circuit is this?
A: This is a Series Circuit.
Q: Do you even really need a battery box?
A: No, but it will be much easier for your kids to manipulate the wires and connect them to the bulb if they aren't worrying about connecting them to the battery too. You could always tape the wires to the battery, or connect them with a short, thick rubber band. Battery boxes are really the way to go though.
Q: Do you HAVE to do Solution 1 first?
A: Of course not! I chose that sequencing randomly. It is just as likely and correct for a team to figure out Solution 2 before Solution 1. I even see teams occasionally figure out Solution 3 or 4 before 1 or 2!!
1. Why do Solutions 1 and 2 both work? As long as you're using an incandescent bulb, it doesn't matter which wire goes where as long as there is one wire on the "very, tip-tippy bottom" of the bulb, and one wire touching the metallic side. If you used LED bulbs instead, that would be a different story!
2. Draw a diagram on your whiteboard (if you have one) except for the wires. Have kids compete the diagram by connecting the wires on the diagram to the appropriate part of the bulb you drew on the board!
Pressure, Endothermics, Action/Reaction and High Flying Science Fun.
Hey Nerd! It's another fun, easy-to-set-up Experi-Graphic from Pow!Science! This experiment is an absolute classic and a huge favorite whenever we do it in school programs or at our popular science birthday parties. The only tricky item to find is the Film Canister itself, but I've heard rumors that anywhere actual Film is still developed has them and will often give them away for free.
You can also find empty film canisters for sale out there on the interwebs. Just remember that you need the translucent whitish colored ones with the cap that snaps shut INSIDE the container. The black ones with the gray caps that snap on the outside of the container will not work.
Enjoy and be SURE to read the Extensions and Safety Tips below the Graphic itself.

We strongly recommend the use of safety goggles when performing this experiment. HOWEVER, you can certainly perform the experiment without them (we do) as long as you pay CLOSE attention to STEP 7: SIT BACK and WAIT. The Rockets ALWAYS launch straight up. They can only hit you if you are OVER them. So don't be. It's that simple.
1. Try experimenting with different amounts of water in you canister. How does the amount of water affect altitude?
2. Try using warm water. How does water temperature affect the rate of the reaction?
3. Got a digital thermometer? Drop a few Alka Seltzer tablets into a glass of water while measuring the water's temperature. What happens to the temperature? The result may surprise you! HINT: This is an endothermic reaction!
4. How Much Tablet do you Need? Half a tablet is plenty to launch a rocket. Does this, however, affect the amount of time it takes to launch after capping? Will a quarter tablet launch a rocket?
5. Is it a "Real Rocket"? Real rockets fly ballistically. They carry their fuel with them and push it out of the bottom of the rocket in order to induce motion in the opposite direction (up). How does the film canister rocket differ from true ballistic flight?
6. Just for Fun: Put a drop of food coloring into your water. It makes no difference. It just looks cool!
We can't stress enough that there is NO HURRY to cap the canister after dropping the tablet in. There is SO MUCH fizz-potential in the tablet, that it will keep fizzing for quite a while and still have plenty of fizz left to launch the rocket once you get it capped. It's better to take your time and snap the cap on securely and properly than to hurry and fail to get the cap on securely.
An Experiment in Neutral Buoyancy
What do you call a helium balloon that neither floats up nor sinks down? A FLINKER of course! Follow the steps below for a great little challenge activity to try in your classroom. Try it! Keep reading after the graphic for Pro Tips and a little bit of extra info.

1. Even though this is noted in the graphic above, I'd like to stress again the importance of using small pieces of cotton ball to help achieve truly neutral buoyancy. The balloon will be extremely sensitive to even minute changes in mass. Push yourself and really try to get it "hanging there", perfectly flinking!
2. If one balloon doesn't lift your cup at all, attach a second balloon. You could also try adding a second balloon simply to make the activity more challenging!
Q: Why add the Penny?
A. Adding the penny at the beginning of the experiment saves you having to add a LOT of Cotton Balls before the weight in the cup begins to pull the balloon back down.
Q: Do you really have to punch holes in the sides and thread the balloon string through?
A. Perhaps not, but it's the easiest way I've found to keep everything centered over the cup.
An Easy Game to Learn, but a tough one to truly "WIN"!
Greetings Math Enthusiast! Thanks for stopping by - we are very happy you're here!
Here's a fun, free, easy-to-use printable for a nifty Math Game from Pow!Science!
Print out the Number Chips Printable Below! Cut them out, get a pair of standard, 6 sided dice and you're ready to play. Read past the Graphic for the rules, optional add-on ideas and Gameplay Tips!
1. Place all of the Number Chips on the table, number sides up.
2. Roll the Dice. Flip over any combination of Number Chips that equals the total of your dice roll. EXAMPLE: You roll a 5 and a 3, total 8. Flip over the 8, the 5 and 3, the 6 and 2, the 7 and 1. Any combination that totals 8 is OK!
3. Keep Rolling until you can't flip over any more Number Chips. The Chips that remain Number Side up are your score for that round. As in Golf, you're looking for a LOW SCORE.
4. Lowest score at the end of a pre-determined number of rounds is the WINNER!
1. Expand the rules to include subtraction. EXAMPLE: You roll an 8; flip over the 10 and 2 because 10 – 2 = 8!
2. Add a Bonus score of -5 Points if you roll a "Perfect Round" (All Chips Flipped!).
1. Get rid of those BIGGER Numbers as soon as possible! They are score killers!
2. Hold onto that "1" Chip - don't use it until you HAVE to!
Use the Greenhouse Effect to grow seeds without soil!
It's another fun, easy-to-set-up Experiment to try in your classroom (wherever that may be).
1. Dip the paper towels or cotton balls into the water to moisten them. They should be damp, but not dripping wet (squeeze 'em out a little if you have to).
2. Place the wet paper towels/cotton balls into the baggie.
3. Put the seeds into the bag between the cotton balls and the plastic (so you have a nice clear view of the seeds).
4. Seal the baggie, take it home and tape it to a window where it will get plenty of sunlight (seeds won't need sunlight to germinate, but the leaves that come out will appreciate it!).
5. Observe the seeds for several days.
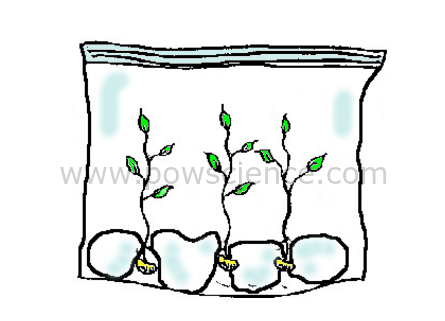
Short infrared waves (heat) of sunlight enter the bag, where they become longer infrared waves that cannot escape the bag. This makes the bag into an ideal growing environment - a Greenhouse in a Bag! Initially the seeds get everything they need to grown from the bag, the water & the sun.
Will different seeds sprout at different speeds? Why? Can you try several kinds of seeds and make a chart to compare them? Do you think how the seed is positioned in the bag will affect which way it sprouts?
When your sprouts have grown to at least an inch in height, transfer them into soil so your plant will continue to grow!
Let's change something besides the frequency!
Sound is fun to teach, and there are a ba-jillion and one demonstrations and experiments out there that showcase frequency and pitch, but not that many which address the amplitude of a sound wave. This one will absolutely blow your students away, and it is SO EASY to set up!! Don't worry, the sound produced is not deafening or disturbing - kids LOVE it and will do it for as long as you let them.
Read past the graphic for Explanations and Extensions, and thanks for trying it out!

Of course all sound comes from a vibrating source, in this case, the hanger as it bumps against the desk, chair, or what have you. The metal vibrates, and that vibration is carried along the string, into your fingers, and into one of nature's great amplifiers - your skull. We don't change the frequency or pitch a lick in this experiment - but we do change the amplitude of the waves that strike your ear drums!
Have kids bump the hanger against the desk or chair WITHOUT putting their fingers in their ears. They'll feel the vibration in their fingers. They'll hear the tinny, small sound of the hanger clinking against the object. Then tell them to put their fingers in their ears and try again. Why is the sound so different? This is a great opportunity to discuss how sound is a media-dependent form of energy - that it needs a medium to travel through - and that some media conduct sound much better than others. In this case, the sound traveling through the air (fingers out of ears) is not conducted very well. Removing that poor conducting medium from the equation by sticking our fingers directly into our heads allows the sound to be conducted through a solid medium (our bodies). Wonderful!
Tell kids to try this at home. All they need is a hanger and string. Will the experiment work with a wooden hanger? How about a plastic hanger?
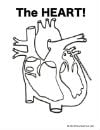
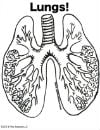
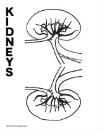
Making Life-Sized Human Body Posters with the Kids
We use big rolls of craft paper - simply lay out a sheet that's 4 or 5 feet long for each kid and have them lay down on it. Trace their body with a marker! Then, have them color each of the following Organ .pdfs, cut out and tape or glue it to their poster! (We recommend reducing the full sized printouts for this activity, as the full size organs probably won't fit in the body outline of most kids).
You could also label each organ on your poster for added detail. There are lots of directions to take this activity! Feel free to download and distribute these Human Body Organ Printables!
List of PDF files

Fun & Easy Procedure for Making Ice Cream!
Use this easy procedure to make Ice Cream in your classroom wherever it may be, and make sure to read past the graphic for Extension Ideas and some Science Q & A!

1. Try different extracts! At our KinderScience Class we made several available like Strawberry, Mint, Banana & more. Get creative!
2. Add Chips! White Chocolate, Milk Chocolate, Toffee, whatever you like! Throw a Tablespoon of your favorite mix-in to the small bag before you shake it!
3. Add a drop of food coloring just for fun.
This procedure works very well with ice, but it also works GREAT with SNOW! So, if you have a source of clean snow, give that a try.
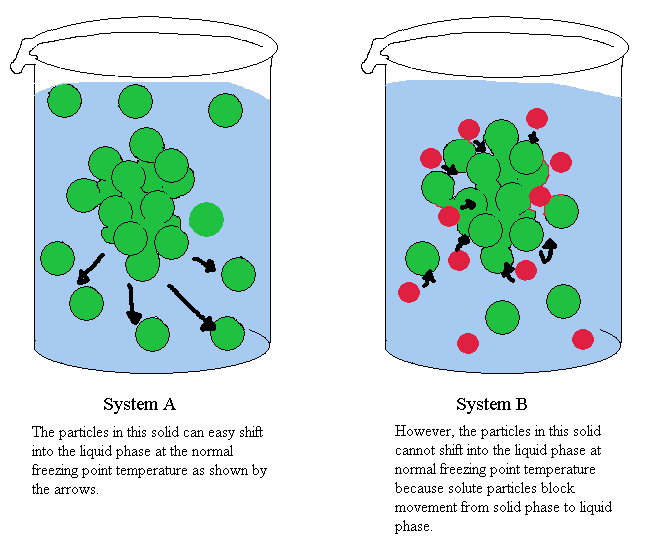
Q. What is Freezing Point Depression?
A. It's making the freezing point of a liquid lower! In the case of water, adding a solute like salt drops the freezing point below 0 degrees Celsius (32 degrees Fahrenheit). When water freezes, its molecules get all nice and lined up in crystal form. Salt gets in the way and blocks them from doing this, so in order to get together, it needs to be even colder. There are lots of nice explanations of freezing point depression out there such as ChemWiki and others.
Get ready to learn a trick that you'll master within 2 or 3 tries and amaze people with every time you do it. It's the Incredible Inertial Egg Drop! GREAT intro demonstration for Newton's 1st Law! Keep reading below the graphic for some content & extension info.

Newton's First Law of Motion (the Law of Inertia) says that objects at rest tend to stay at rest unless acted upon by a force. That's why this works - the egg has significantly more inertia than either the bowl or the tube, and is therefore much more difficult to stir from rest. When you apply force to the bowl, the tube is knocked out by the bowl's wall, but the egg's inertia keeps it at rest until it is acted upon by an outside force - namely, Gravity, which pulls it straight down into the waiting glass of water.
1. You might go through an egg or two while getting this one down pat. I suggest putting your entire set-up onto a tray during your learning period. That way, any broken eggs will be on the tray for easier clean-up.
Practice hitting the side of the bowl with just enough force to knock it and the toilet paper tube out, but be careful of too much follow through - you do NOT want your hand to be under the falling egg!
Keep the force of your strike perpendicular to the glass - in other words, hit it sideways - no upward or downward force!
Start with a Toilet Paper Roll. When you're confident and hitting that every time, try moving up to a paper towel roll!
An Experiment & Game to Explore Sir Isaac Newton's 1st Law of Motion: The Law of Inertia!
It's another fun, easy-to-set-up Science Game from Pow!Science! This game was inspired by a game I played as a kid called "BASH!" This game featured a man's head atop a stack of plastic disks. At the bottom of the stack were the man's feet. The object of the game was to use a plastic hammer to knock the disks out without toppling the stack! Get some nickels & a ruler ready and GO!
Follow the steps below for a great little challenge activity to try in your classroom wherever it may be. Try it! Keep reading after the Procedure for Pro Tips and a little bit of extra info.
Sir Isaac Newton's 1st Law of Motion tells us that objects that aren't moving will remain that way until a force acts upon them. Thus, the nickels will stay put after you stack them until you whack one of them with the ruler. If you're quick, ONLY the nickel you hit will move, because the ruler is only applying a force to the nickel it hits.
There is another force at work here too - friction. Friction opposes motion (it tries to keep things from moving). There is friction between the nickels and between the bottom nickel and the table. The ruler has to hit the nickel with enough force to overcome the friction between the nickels. If not, the nickels move as one and topple.
On a successful hit, when a single nickel shoots out from the bottom of the stack, which force is stronger - the ruler's striking force or the friction force between the nickels?
Newton's 1st Law also tells us that objects that are moving won't stop moving until acted upon by a force. As a struck nickel slides across the table, why does it stop? Why doesn't it simply keep sliding? Is there a force acting upon it like Newton's 1st Law says?
Q. Why Nickels? Why not dimes or pennies?
A. Nickels are typically wider than your average ruler. If the ruler you use is thicker than a nickel, what problems could that cause?
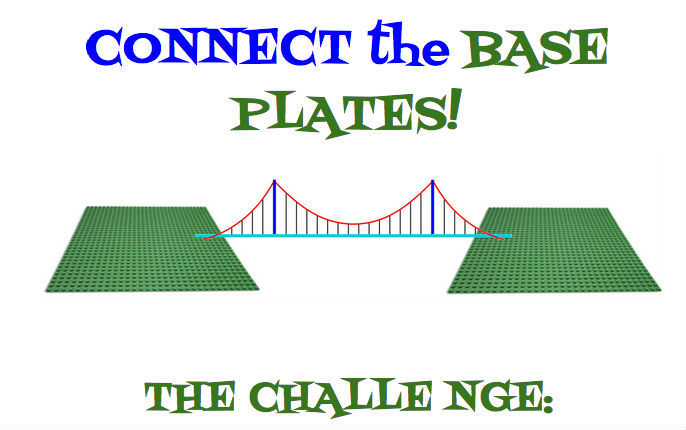
Connect one baseplate to the other with LEGO Pieces. The only catch? None of the LEGO pieces you use may touch the table. Go!
So, that's it! Very easy to set up, and you can easily change the degree of challenge presented by moving the plates further apart or closer together. I definitely recommend taping the plates down to your work surface to prevent sliding.
Free Printable LEGO Activity from Pow!Science!
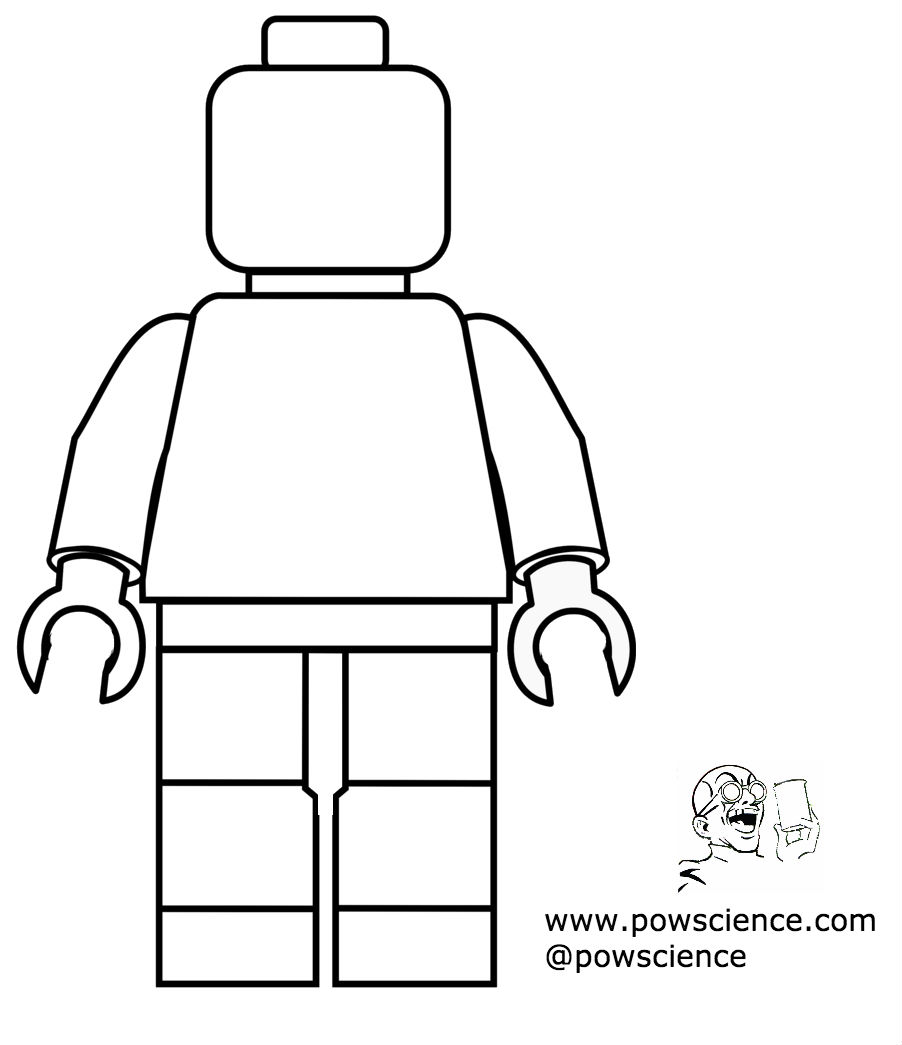
LEGO is great, Mini-Figs are awesome, and kids like coloring their own. Click the image of the Mini-Fig below to view the image at full size and without all the junk in the way so you can print it. Feel free to photocopy it, share it, distribute it, etc. We got the hard copy of this one at a LEGO Party and touched it up just a bit in Photoshop, smoothing some edges and adding a bit of detail. Enjoy!
1. I used brightly colored printer paper for my square and rectangles.
2. Build your squares and rectangles with LEGO pieces first, then measure and cut your paper pieces to match. I traced the borders of my pieces with black marker (purely to make them look good), and then laminated them and cut them apart. Yes, I laminate everything. I love laminating.
The pictures below pretty much explain the entire activity. You can use a variety of sizes to mix it up, use different colors to make it spiffy and you can create shapes with more than 4 sides! My worksheet is designed for 4 sided shapes, but could be easily adapted for shapes with more than 4 sides.
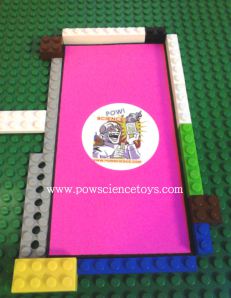
Surround your Shape with LEGO Pieces! You can even overlap at the corners, as long as you only count the dots that are actually along the edge of the Shape! For example, the bottom edge of the paper shown here is 10 dots long.
Lego Perimeter Worksheet (PDF)
Lego Perimeter Workstation (PDF)
That is it my friends! After a bit of work on the front end, this is an easy activity to break out and set up in a jiffy.
Soon kids will be designing their own shapes to measure. Obviously this activity can also be extended to measuring Area.
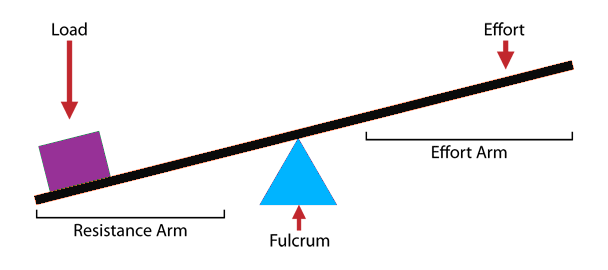
An Experiment in Simple Machinery & Mechanical Advantage!
All you need is a ruler, a pencil, a piece of tape and some pennies to set up a powerfully effective experiment in Mechanical Advantage. Check out the graphic procedure below and don't forget to read the Presentation Ideas after the graphic!

1. Make sure the kids place the ruler atop the pencil such that the ruler is perpendicular to the pencil. I like to use the activity as an opportunity to introduce the word "perpendicular" to groups that aren't already familiar with it.
2. Prediction is a big part of making this experiment effective. After your stack of 5 pennies is in place, but BEFORE placing pennies on the other end, have your groups predict how many pennies it will take to lift up the stack of 5. In most instances it will take either one or two pennies only. Phrasing your question like this can help: "Do you think it will take 5 pennies, more than 5 pennies, or less than 5 pennies?" That way, when one or two pennies do the lifting, the answer "Less than 5" is correct for both.
I always use Dixie Cups to hold the pennies.
An Experiment in Aeration!
What are you really doing when you whip cream into butter? You're adding air to the mixture! Try this simple experiment that you get to eat afterwards, and keep reading after the graphic for Pro Tips and a little bit of extra info.
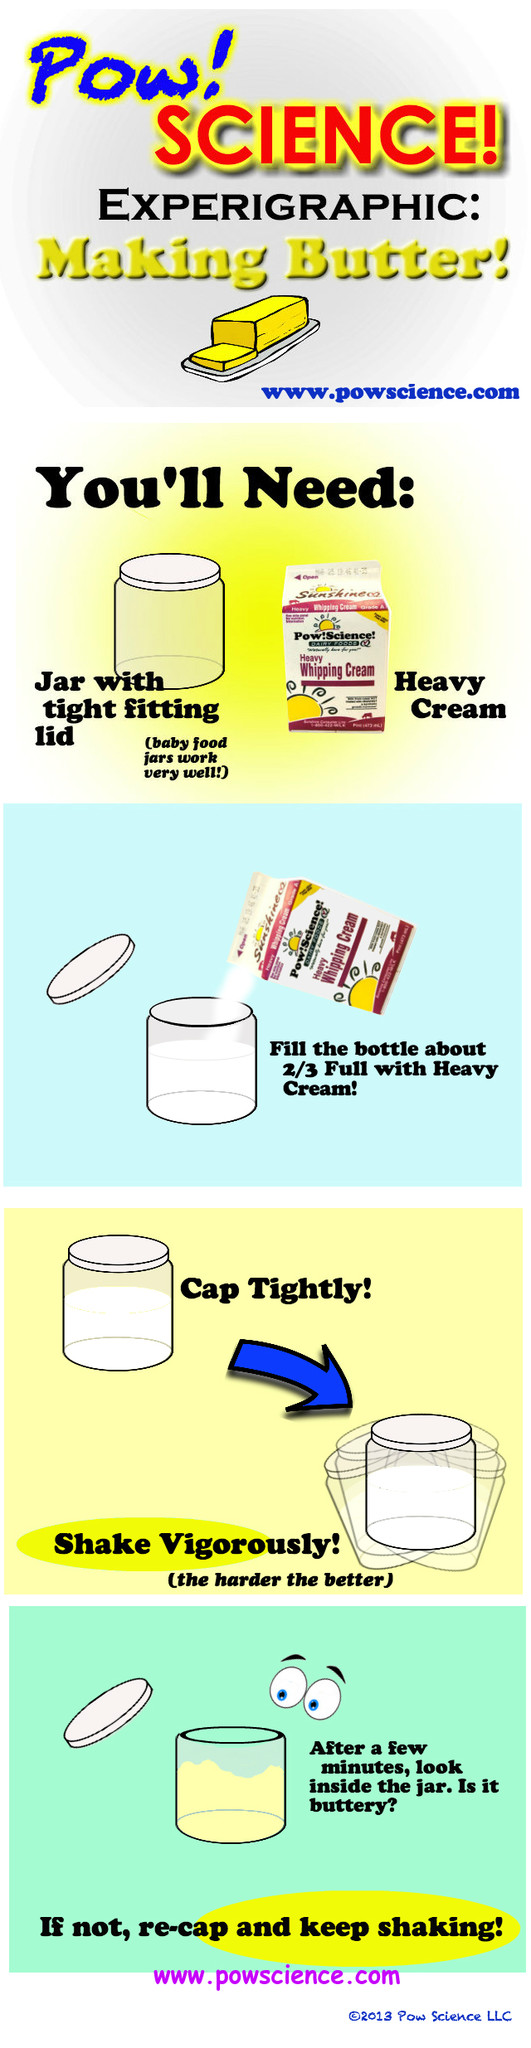
1. Try adding some other ingredients to your Butter! Perhaps some herbs, or a bit of salt!
2. Stop shaking a little bit sooner and add some powdered sugar to make Whipped Cream!
An Experiment in Chemistry
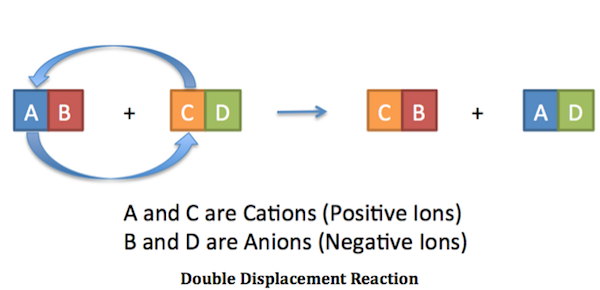
We've got a double replacement reaction for you that will make old pennies shine like new with just a couple of easy-to-find ingredients. Try the experiment & be sure to keep reading AFTER the graphic for explanations of what is going on here.
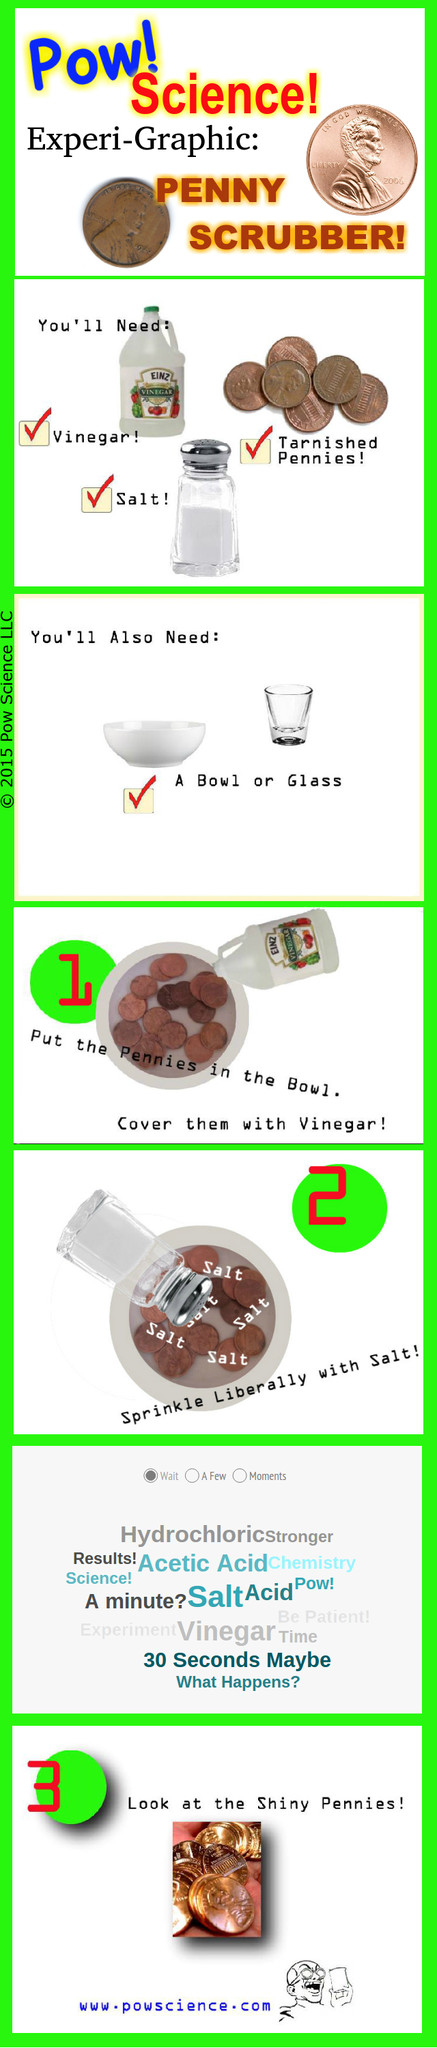
Vinegar contains Acetic Acid (usually 5%): Chemically represented as C2H4O2
Salt is Sodium Chloride,: Chemically represented as NaCl
Therefore: C2H4O2 + NaCl = C2H3NaO2 + HCl
The products of the reaction (see balanced equation above) are Sodium Acetate (C2H3NaO2) and Hydrochloric Acid (HCl). Hydrochloric Acid is stronger than Acetic Acid, and helps to clean the pennies more rapidly than weaker Acetic Acid will by itself.
Here's a fun, simple experimental procedure that is a neat variation from the classic "Celery Leaves" experiment - plus, it saves you the expense of buying the celery, as Queen Anne's Lace grows all over the place in mass quantities, so you probably won't have a problem finding some.
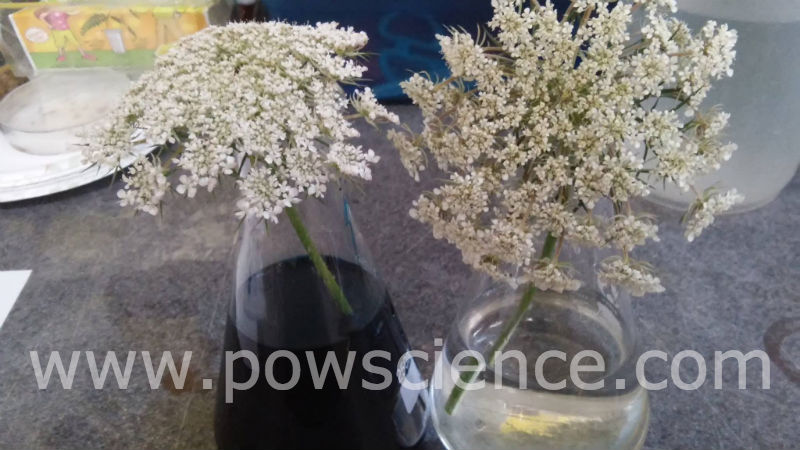
Set up your containers with some water and cut the stems of your Queen Anne's Lace. Make sure not to cut the stem too short! You definitely want it to be submerged in your liquid. Add a LOT of food coloring. To 200ml water, we added 35 drops of dark blue food coloring. Then wait 24 Hours.
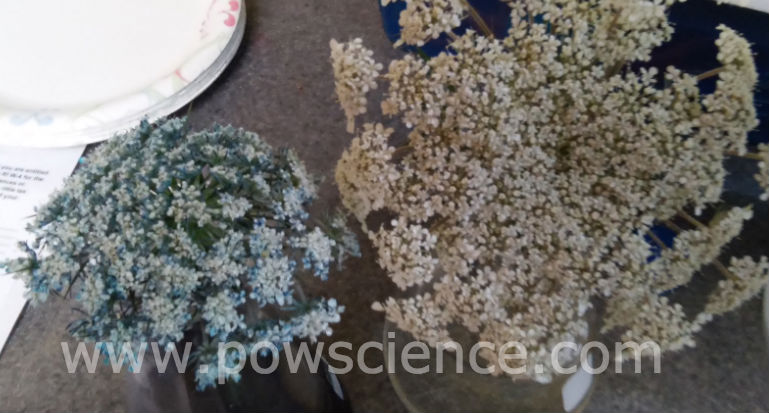
As you can see from this picture taken not quite 24 hours later (actually I took it after only 18.5 hours) the flower on the left has absorbed the blue food coloring, which has traveled up the xylem and out into the petals. Super neato! Great demonstration of liquid transport in plants.
1. Try this with the classic Celery Leaves.
2. Try this with different colors of food coloring. Which colors show up the best?
3. Try this with the flowers in sunlight - does that affect the rate of liquid flow?
Groups of 2 or 3 work well. Give each group a stack of either 6 or 7 cups (decide ahead of time if you're going to include Indigo. I don't when leading a group through this experiment. I do if running this experiment as a test of ability to follow procedure.This narrative will assume 6 cups.
1. Have each group unstack their 6 cups and arrange them neatly in a row. Have them count the cups to make sure there are 6. Fill each of three cups about 3/4 full of water.
2. Distribute one tablet of each color - red (looks purple), blue & yellow - to each group. Have them drop one tablet into each cup of water. The empty cups stay empty for now. Encourage the kids to describe what they're seeing at the bottom of the cup. The bubbles are full of Carbon Dioxide. The tablets are dissolving/getting smaller (not "melting"). The color starts out light and gets darker. The bubbles slow down. There are lots of observations to be made during the dissolving phase of the experiment. It is also noteworthy that all 3 states of matter can be observed in the cup simultaneously; solid tablet, liquid water, gasseous bubbles.
3. When the bubbles have mostly stopped, it's time to start mixing colors. I prompt with something along the lines of "What we've got here are three colors of the rainbow (or 'visible spectrum' if we want to use very scientific terms!) but there are also some colors missing! Let's see if we can discover and create the mystery missing rainbow colors".
4. Ask someone to volunteer the first "missing color". Once you get a correct answer (Green, Orange or Purple/Violet), ask someone else if there are any colors that we do have that we can mix to make the missing color. If you get a wrong answer here, make the call - sometimes, with some groups, it is fun and beneficial to test a combination that you know is not correct. Sometimes, with other groups, I can tell that this would not be a good time to have a student experience being wrong in front of the group, so I steer them back on course until I get the combination we need to make our first "mystery color". You know your kids, so do what will work in your classroom.
BEFORE YOU START MIXING, go over the "Rules for Pouring". Mine are:
5. These color tablets must be mixed as follows to "mix true" and give nice, recognizable secondary colors. If you reverse the color sequencing, your colors will be too dark and you'll run out of water quickly, trying to dilute dark primary colors with light ones.
2 Fingers of Yellow + A Little Bit of Blue = Green
2 Fingers of Yellow + A Little Bit of Red = Orange
2 Fingers of Red + A Little Bit of Blue = Purple/Violet*
*Science makes no distinction between Purple and Violet, wavelength-wise. As I sometimes tell the kids, "They might be different in the Crayola Box, but in the Lab, they're the same."
6. Soon you'll have all 6 colors. Time to line them up in "Rainbow Order"!
Red-Orange-Yellow-Green-Blue-Violet
HERE'S WHY I don't want you to make Indigo - with the colors lined up, there is an important pattern to point out to the kids. The Secondary Colors are all between the Primary Colors that we mixed to create them - yes, even Violet, once you move the cups into a circle instead of a straight line. If indigo is already in the lineup, this pattern does not hold. AFTER putting the colors in a circle and discussing the pattern is a great time to bring up indigo. Indigo was originally named as one of the 7 colors of the spectrum by Isaac Newton in the 1660s and its place in the spectrum has been a subject of controversy for its inclusion ever since. Reasons for the controversy include the possibility of Newton's attributing 7 colors to the spectrum because there are 7 primary musical notes and/or the existence of 7 planets in 1660s.
1. Place a 7th cup between Blue and Violet and pour equal parts to make Indigo.
2. Reward kids with a couple of extra empty cups and invite them to "invent" colors for a few minutes, encouraging them to mix "whatever with whatever" to create and name NEW colors!
You'll notice I've completely avoided "ROY G BIV" in my description. As a Science Enrichment specialist, I usually omit it during my presentation in order to leave this aspect of the spectrum for the teacher whose classroom I'm visiting to delight the kids with.
This activity for all its simplicity has enormous reach. Pouring/Fine Motor Skills. Estimating. Teamwork. Mixing. Solids, Liquids & Gasses, the History of Science and the actual Science of the Electromagnetic Spectrum of course!
Try it! Every time you do it, you'll think of new things to talk about and more extension ideas. I love it. You will too!
Hey there Robo-Nerd! During a recent Robot Workshop for younger Science Kiddos (Ages 4-8), we designed & printed out some very basic "robot parts" onto card stock. We had the kids color, cut and connect the pieces using common Brass Fasteners (not "Brass Tacks", but "Brass Fastener Robot" didn't sound as catchy). The kids had so much fun designing their Robotic Buddies that we decided to turn the Robot Pattern into a Printable!
All you'll need beside the Printable Image (click below on the Robot thumbnail to view the full sized image) is crayons, scissors and brass fasteners. We also definitely recommend printing out on Card Stock so your Robot holds up to some handling.
Scroll down past the images to check out some Extension Ideas. Have fun!

1. While the kids are coloring, ask them what their Robot's job is.
2. Have them draw in Gears, Buttons, Circuits and Lights on their Robot's body!
3. Draw a Robot Face ~or~ break out some Googly Eyes and stick 'em on there!
We love trying out hands-ON Experiments for the Elementary Level, and here's one that will astound the uninitiated...
Two sodas of equal mass & volume seemingly roll at different speeds...but how?
Keep reading below the Graphic for extension ideas and by all means feel free to share and re-distribute this graphic. Have fun!

1. MASS: Make this experiment even better by measuring the mass of each can prior to rolling, and again after. Mass does not change!
2. VOLUME: Nothing leaves or enters the can. Volume stays the same. Why would using two different sodas be a bad idea? Why would using one diet and one regular soda make this an unfair test?
It's Osmosis in Action!
Osmosis is a tricky one for kids to understand, mostly because they get confused about the concentration of water versus the concentration of a substance that's dissolved in the water.

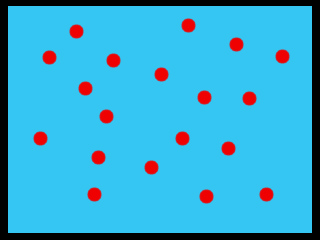
These two containers are the same size. One is full of water. The one is full of water with salt in it.
Q: Which one has more water?
A: The one on the left (solid blue)! In the container on the right, there is space being taken up by salt that could be taken up by water.
Q: So, which one has the higher concentration of water?
A: The one with more water in it! That's the one on the left.
Q: If the space between the containers above was a semi-permeable membrane (permeable to water), which way would water go by osmosis?
A: From Left to Right, as shown here:

Water is going to move from where there is more water (higher concentration) to where there is less water (lower concentration), same as with any diffusing substance. The thing that makes osmosis tricky for a lot of kids is that they get focused on the dissolved substance, not the water itself. Osmosis IS diffusion - it's just the diffusion specifically of WATER.
1. Pour the water into the bowl and add the salt. Stir until the salt dissolves.
2. Obtain 2 slices of potato. Carefully hold them with your fingertips and gently bend them back and forth to get a feel for how rigid they are. Don't break them!
3. Place the potatoes into the salt water and wait 15 minutes.
4. When time is up, pick up the potato slices like before and gently bend them again. Do they feel different?
You probably noticed that when you took the potato slices out of the salt water and bent them again, that they were much less rigid than before - way more "bendy"! Well, that potato is made of thousands of tiny cells, which are like little bags filled (mostly) with water. When you put the potato into salt water, water moved OUT of the potato's cells and into the water in the bowl. As the water left the cells, they became more saggy and limp. This movement of water is called osmosis!
Can you think of a way to make the potato slice rigid again? How about trying this experiment with something besides a potato slice?
Air Resistance made EASY!
This experiment is cheap, easy, fast, and effective. Try it & see! READ after the procedure & picture for questions & extension ideas.
1. LOOK at the picture below. Tape one penny as shown on the card on the left (it's taped to the center of the card) and tape the other penny as shown in the picture on the right (it's taped to the edge of the card).
2. Stand up and hold both cards by an edge out at arm's length so that they're parallel to the floor. It's important to hold both cards at the same height above the floor.
3. Drop both cards at the same time. Watch them fall! Which hits the ground first?
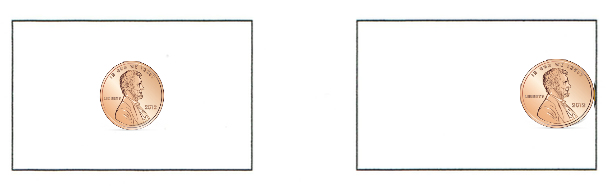
You probably saw the card with the penny taped to the edge hitting the floor well before the card that had the penny taped to the middle. Taping the penny to the center of the first card causes it to fall without turning - thus, it keeps maximum surface area facing the floor as it falls. All of that surface area is pushing against the air.
The card with the penny taped to the edge tips and falls "head first", presenting an edge (much less surface area) downward, enabling it to cut through the air much faster.
The more surface area of card that has to push through the air, the great the drag of the air against the card. Here's the official science definition of "drag".
Drag (in physics): For a solid object (like an index card) moving through a fluid or gas (like the air), drag is the sum of all the aerodynamic or hydrodynamic forces in the direction of the external fluid flow (like the air pushing against the card). It therefore acts to oppose the motion of the object (the more card area that gets hit by air, the slower it falls).
1. Try using nickels instead of pennies.
2. Try using different sizes of index card.
3. Drop two pieces of paper that are equal in size. Then crumple one of them into a ball and drop them again. What changes?
1. If you're skydiving, why is just having a parachute not enough? Why must you open it for it to be useful?
2. Why are arrows (like the kind you shoot from a bow) pointed?
3. Why are rocket ships pointy at the top?
4. According to the definition above, Drag occurs in all fluids, not just air. Which would sink faster, a cannonball or a big sheet of metal that weighed the same amount? Why?
Sound is all about Vibration! This Pow!Science! Experi-Graphic will tickle your lips with vibro-sound-making fun! It's super simple and the kids will love it.
All you need is a regular drinking straw and a pair of scissors. It will take a little bit of practice to get the lip-pressure just right to get this thing humming, but you'll have it working wonderfully in just a few tries, and so will your students.

Inside the Straw Kazoo, you're vibrating a column of air. The shorter the vibrating source, the higher the frequency of sound-wave produced, and therefore the higher the pitch.
If you cut a notch/hole in the straw (See Pro Tip #2 Above), you'll hear a big difference in pitch when you plug the hole with your finger and then release it.
This experiment will pull such a great vacuum that kids will have trouble separating the plate & cup after the candle goes out! Add a drop of food coloring to your water if you want to jazz up the visuals a bit.

OTHER PRO TIPS: Use a cup just barely wide enough to fit over the Tea Light, and you'll likely see the candle float right up into the cup as the water is pushed in by the atmosphere.
CAUTION: If your cup is made of plastic and very short, the candle may soften the plastic, and the atmosphere will then push the plastic in.
After suction is established, pry the cup very slowly up from the plate and you'll see air bubbling into the cup from outside as pressure is equalized.
As the candle burns, it depletes the oxygen supply in the cup. This sets up a very slight vacuum inside the cup. This difference in air pressure inside and outside the cup tips the balance of pressure in the atmosphere's favor (there is more air per unit volume outside the cup than inside), so the atmosphere pushes the cup down onto the plate.